Progressively fillable notebooks
Contents
YouTube Video demonstrating progressively fillable notebooks in action
A common difficulty encountered by students on their first exposure to
programming concepts is the inability to string together simple steps
to accomplish a complex task. For example, they may grasp the concept
of an if block and a for loop separately, but putting those
constructs together turns out to be much harder. When assigned a
multi-step task to perform, some of the students will get stuck on the
first task and never make any progress. One can address this by
progressively revealing the solutions to each step, and then moving on
to the next step. If this is done in a synchronous fashion for the
whole lab, the stronger students will need to wait at
each step for the weaker students to catch up.
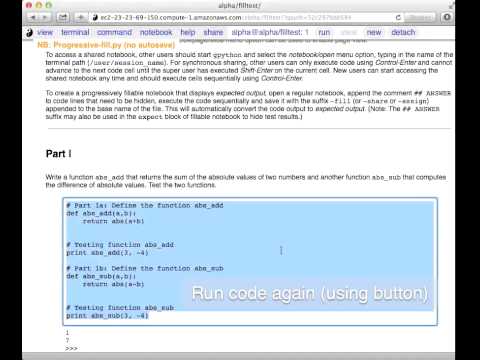
An alternative approach is to automate this process to allow students make incremental progress. As the Notebook interface has proved to be extremely popular with the students, an experimental progressively fillable version of notebooks has recently been implemented in the GraphTerm server. A notebook code cell is assigned to each step of a multi-step task, with associated markup cells for explanatory text. Initially, only the first code cell is visible, and the remaining code cells are hidden. The code cell contains a “skeleton” program, with missing lines (:num:`Fig. #figfillablea`). The expected textual or graphical output of the code is also shown. Students can enter the missing lines and repeatedly execute the code using Control-Enter (or the run button) to try to reproduce the expected results. If the program runs successfully, or if they are ready to give up, they press Shift-Enter to move on. The last version of the code executed by the student, whether right or wrong, is saved in the notebook (as markup), and the correct version of the code is then displayed in the cell and executed to produce the desired result (:num:`Fig. #figfillableb`). The next code cell becomes visible and the whole process is repeated for the next step of the task.
One can think of progressively fillable notebooks as providing “training
wheels” for the inexperienced programmer trying to balance different
algorithmic concepts at the same time. This approach is somewhat
analogous to simple unit testing using the doctest Python module,
which runs functions with specified input and compares the results to
the expected output.

View of progressively fillable notebook before user completes Step 1. Note two
comment line where it says (fill in code here). The user can
replace these lines with code and execute it. The resulting output
should be compared to the expected output, shown below the code
cell.

View of progressively fillable notebook after user has completed Step 1. The last
version of code entered and executed by the user is included the
markup, and the code cell now displays the “correct” version of the
code. Note the comment suffix ## ANSWER on selected lines of
code. These lines were hidden in the unfilled view.
Creating progressively fillable notebooks
The user interface for creating progressively fillable notebooks in this
experimental implementation is very simple. The instructor creates a regular
notebook, with each code cell corresponding to a specific step of a
complex task. The comment string ## ANSWER is appended to all code
lines that are to be hidden (:num:`Fig. #figfillableb`). The code in each
successive step can depend on the previous step being completed
correctly. Each code cell is executed in sequence to produce output
for the step. The notebook is then saved with the suffix -fill.py.gnb.md
appended to the base filename to indicate that it is fillable. This
saving step creates new markup from the output of each code cell to
display the expected output in the progressively fillable version of the
notebook. Once filled by the students, the notebooks can be
submitted for grading, as they contain a record of the last attempt
at completing each step, even if unsuccessful.
Using progressively fillable notebooks
Use Control-Enter to execute filled code without saving it. This can be repeated as needed, until the filled code yields the correct results. (As a special case, deleting the entire code cell and typing Control-Enter will restore the originally displayed content.) Use Shift-Enter to save filled code and advance to the next code cell. The previous code cell will display the correct (ANSWER) code after this operation, and the filled code cannot be modified. Cells further down are hidden until your reach them after successive Shift-Enter operations, but if the first line of a Markdown cell following a page break (triple-dash) starts with “#”, then the first line alone is displayed (as a section heading). The notebook/page/slide menu option can be used to enable page view.
Synchronous sharing of progressively fillable notebooks
Progressively fillable notebooks can be deployed in a synchronous fashion, where the instructor guides students through each step in a complex calculation:
- Edit a regular notebook to make it fillable as described above, but
save using a suffix starting with
-sharein the filename (instead of-fill). - Open the
nb_name-share.py.gnb.mdnotebook in a terminal with a session path like/local/nb_name. The GraphTerm server will automatically export the notebook content for access by other users. - To access a shared notebook, other users should start
gpythonand select the notebook/open menu option, typing in the name of the terminal path (/local/nb_name). Other users can only execute code using Control-Enter and cannot advance to the next code cell until the instructor has executed Shift-Enter on the current cell. (The last attempt by each user at running code in the cell is recorded in that user’s notebook.) Users joining late can start accessing the shared notebook any time and should execute cells sequentially using Control-Enter until they reach the current cell. - If a subdirectory SUBMIT is present in the same directory as the shared notebook file, other users can submit the filled shared notebook to this directory using the notebook/submit menu option.
Assigning work using asynchronous progressively fillable notebooks
An instructor can also deploy progressively fillable notebooks in an asynchronous fashion, where students work on the steps in a notebook at their own pace and then submit their filled notebook at the end:
- Edit a regular notebook to make it fillable as described above, but
save using a suffix starting with
-assignin the filename (instead of-fill). - Open the
nb_name-assign.py.gnb.mdnotebook in a terminal with a session path like/local/nb_name. - While the instructor’s terminal session is active, other users can
start
gpythonand select the notebook/open menu option, typing in the name of the terminal path (/local/nb_name) to open the notebook. Then they can work on it using Control-Enter to try out code, and Shift-Enter to display the correct answer and move on to the next step. - If a subdirectory SUBMIT is present in the same directory as the shared notebook file, other users can submit the filled shared notebook to this directory using the notebook/submit menu option.
Sample fillable notebooks
The Python notebook file
$GTERM_DIR/notebooks/Progressive-demo.py.gnb.md was opened, executed, and saved as a sample
fillable notebook with the name Progressive-fill.py.gnb.md. You may open this file to test the fillable
features. You may also copy this file as
Progressive-share.py.gnb.md to share it synchronously from your
terminal session, or copy it as Progressive-assign.py.gnb.md to
create an assignment.
There is also a fillable Bash notebook
$GTERM_DIR/notebooks/Bash-fill.sh.gnb.md, that you can open using
the notebook/open menu option or by clicking on the output of the
gls command.