Setting up a Virtual Computer Lab
Contents
- Setting up a Virtual Computer Lab
- Quick setup
- Domain name and IP address
- Network security and port access
- Launching a server instance
- Managing instances
- Starting and stopping GraphTerm server
- Access codes
- Using https
- Running a public IPython Notebook server
- Administering the virtual computer lab
- Configuring groups
- Secondary cloud instances
This section describes how to configure a Virtual Computer Lab using GraphTerm on a Linux/Mac server. Some notable features are:
- Automatic user creation, with the option of Google Authentication
- All users share a single python installation and can access data files on a cloud server
- Students can access terminals and notebooks remotely using a browser, both in class and from home
- Students can collaborate by accessing each others terminals and using a rudimentary chat feature
- Progressively fillable notebooks can be used to provide scaffolding for teaching students to write complex programs
- The instructor can monitor students’ work while it is in progress and comment on it using chat
A companion section provides information on Using the GraphTerm Virtual Computer Lab after it has been set up. It can be printed and distributed to the users to serve as a quick start guide.
Note: The GraphTerm multiuser option is meant to be used for teaching purposes or for collaboration among trusted users. It should not be used if there is sensitive information on the server that should be protected from users.
Quick setup
The following steps allow you to quickly launch a “virtual computer lab” with multi-user support. GraphTerm supports multi-user logins using digest authentication with shared secrets, or using your Google sign-on. This avoids the need for storing passwords or other sensitive information on the server, thus reducing the security concerns associated with a publicly accessible server.
Case 1: Mac or Linux server with user accounts already created
YouTube Video showing how to set up a GraphTerm server with multiuser authentication
Install
graphtermon your server using the following two commands:
sudo pip install graphtermOmit the
sudoif you are installing as a non-root user within an Anaconda or Enthought Python environment, for example.Say all the user home directories begin with
/Users/..., then run a command like the following as therootuser to start the GraphTerm server with password-lessmultiuserauthentication:
gtermserver --daemon=start --auth_type=multiuser --user_setup=manual --users_dir=/Users --logging --port=80 --host=server_domain_name_or_ipTo stop the server, use
gtermserver --daemon=stop. You can also omit the--daemonoption, to run the server in the foreground for testing. To install GraphTerm as a service, you can copy the script$GTERM_DIR/bin/graphtermdto/etc/init.dand edit it to modify the command line options. If you want automatic new user creation, you can use the--user_setup=autooption, but you may need to modify the user configuration shell script$GTERM_DIR/bin/gterm_user_setup, which has only been tested with Ubuntu Linux.You can use the
--auth_type=loginoption for traditional password-based login authentication, but it will only work with--httpsor--host=localhostoptions (for security). Forlocalhostservers, SSH port forwarding can be used for remote access (e.g.,ssh -L 9900:localhost:8900 remote_name). [If using login authentication, the remaining setup operations can be skipped.]
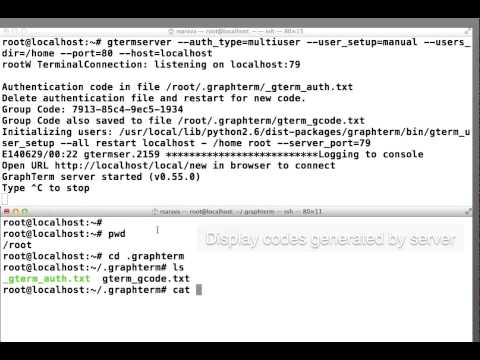
Run the following command as root user to display the master access code:
cat ~/.graphterm/@server_domain_name_gterm_auth.txt(Ignore the port number following the hexadecimal access code.)
Note: If the domain name is
localhost, the filename would simply be_gterm_auth.txt. For automatic new user creation, the group code is in~/.graphterm/gterm_gcode.txtUse the URL http://server_domain_name to open a new graphterm window on the server, with the super user name (
rootin our case) and the master access code

Run the following command in the graphterm window to obtain the individual access code for each user:
gauth -m usernameDistribute this code and a printed copy of Using the GraphTerm Virtual Computer Lab to each user. The first time an user enters their access code, the
~/.graphtermdirectory will be created, and there will be an option to enter the GMail address for authentication.
Case 2: On-demand server using Amazon AWS
YouTube Video showing how to set up a virtual computer lab using GraphTerm and AWS
If you do not already have a Linux server available to set up a
virtual computer lab, you can easily create one on demand using Amazon
Web Services (AWS). The GraphTerm distribution includes the
convenience scripts ec2launch, ec2list, ec2scp, and ec2ssh to
launch and monitor AWS Elastic Computing Cloud (EC2) instances running
a GraphTerm server. You will need to have an AWS account to use these
scripts, and also need to install the boto python module. (These
scripts are routinely used during GraphTerm development to test new
versions in the “cloud”. )
You will need to obtain an AWS account as described here. The AWS account will be linked to your standard Amazon account. (Optionally, you may create an SSH key pair named
ec2keyby clicking here). If you would like to use your GMail account to authenticate, you also need to set up a Google project before starting, following the instructions at Google Authentication.Install and run graphterm on your local (single-user) computer:
sudo pip install graphterm
gtermserver --terminal --auth_type=noneThe above command should automatically open up a GraphTerm window in your browser. You can also open one using the URL http://localhost:8900 (Note: This is insecure on a shared, multi-user, computer; omit the
--auth_type=noneserver option in that case.)

Run the following command within the graphterm window to create a Linux server:
ec2launchThe first time, you will be asked to enter your AWS access credentials, which will be stored in the local file
~/.boto. Then run the command again, enter a tagname (e.g.,testlab), chooseauth_typeasmultiuser, and select thepylabandnetcdfoptions. You may also need to enter your project’s Google Client ID and Secret, which were obtained following the instructions at Google Authentication.When you press the submit button, the generated command line should look something like this:
ec2launch --type=m3.medium --key_name=ec2key --ami=ami-2f8f9246 --gmail_addr=user@gmail.com --auth_type=multiuser --pylab --netcdf testlab

After the new AWS Linux server has completed configuration, which can take several minutes, its IP address and server domain name will be displayed. Then type the following command using the new domain name to login to the password-less super user account
ubuntu:
ec2ssh ubuntu@server_domain_nameRun the following command on the server to verify that
gtermserveris running:
ps -ef | grep gtermserverIf not, and if using AWS, check for errors in the setup procedure by typing
sudo tail /root/ec2launch.logTo restart the server, use
gtermserver --daemon=stopfollowed bysudo /etc/init.d/graphtermRun the following command on the server to display the master access code:
cat ~/.graphterm/@server_domain_name_gterm_auth.txtIgnore the port number following the hexadecimal access code. (You do not need the master access code if your Google Authentication is set up properly.)
Use the URL http://server_domain_name to open a new graphterm window on the server, with the super user name (
ubuntuin our case), using the master access code (or Google Authentication.)

Run the following command in the server graphterm window to display the group access code which should be entered by new users:
cat ~/.graphterm/gterm_gcode.txtDistribute this code and a printed copy of Using the GraphTerm Virtual Computer Lab to all lab users.
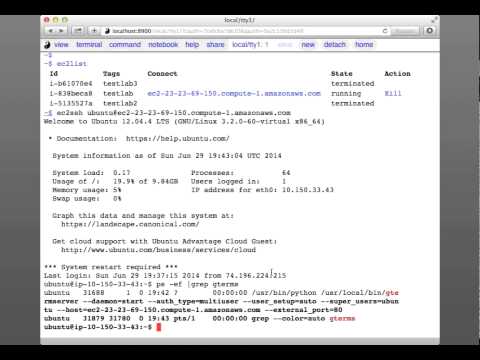
If using AWS, run the following command on your local graphterm window to list, connect to, or kill your instances:
ec2list

Restarting the server
To restart the GraphTerm server, use the commands:
gtermserver --daemon=stop

gtermserver --daemon=start ... (arguments)
To generate a new master access code, simply delete the file
~/.graphterm/@server_domain_name_gterm_auth.txt and restart the
server. This will also make all user access codes obsolete.
Google Authentication
YouTube Video showing how to set up Google Authentication
Here are the instructions to set up Google Authentication:
- Go to the Google Dev Console at https://console.developers.google.com
- Select a project, or create a new one.
- In the sidebar on the left, select APIs & Auth.
- In the sidebar on the left, select Consent Screen to customize the Product name etc.
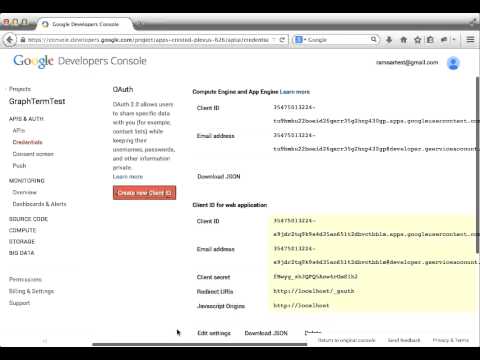
- In the sidebar on the left, select Credentials.
- In the OAuth section of the page, select Create New Client ID.
- Edit Settings to temporarily set the Authorized Javascript Origin to
http://localhostand the Authorized Redirect URI tohttp://localhost/_gauth- Note down the web application “Client ID key” and “Client secret” values
If your GraphTerm server is running, the above instructions, along
with the correct redirect URI, may be accessed at
http://server_domain_name/_gauth.
To support Google Authentication, the GraphTerm server looks for a
file named ~/.graphterm/gterm_oauth.json in the user account
running the server. It should contain the following JSON content:
{"google_oauth": {"key": "...", "secret": "..."}}
Any time you create or modify this file, you will need to restart the GraphTerm server.
The email address linked to each user’s account is stored in the file
~/.graphterm/gterm_email.txt, which may created, modified, or
deleted, as needed. After having set up the server, if you later
decide to use your GMail account to authenticate, you may enter your
GMail address in this file. (If you selected the gmail_addr
option during ec2launch, this file would already have been
created.)
Dropbox and backup
If you wish to have automatic backup and remote access for files, you
can use the Dropbox service which provides a Linux client. You can store all
important files, including submitted notebooks, in Dropbox folders
which are backed up and can be accessed remotely from other computers.
To selectively sync folders on the remote server, download the Dropbox
CLI client dropbox.py from the Linux install page and execute the
following commands:
dropbox.py exclude add Dropbox/*         # Exclude Dropbox/*
dropbox.py exclude remove Dropbox/gterm  # Sync Dropbox/gterm
Instructions for automatically running Dropbox on system startup, with support for multiple users, may be found at http://pixeldust.wikidot.com/linode-setup%3adropbox
Optional steps
If you wish, you may change the group access code to a more user-friendly value (not exceeding 16 characters) in
~/.graphterm/gterm_gcode.txtand restart the server.You may enter an HTML banner message in the file
~/.graphterm/gterm_banner.htmlwhich will be displayed during login.You can use the command
gls --download $GTERM_DIR/bin/gterm.pyto download the executable scriptgterm.pyto your local computer and save the master access code in the local file~/.graphterm/@server_domain_name_gterm_auth.txt. Then use the following local command to quickly create remote graphterm windows:
gterm.py -u ubuntu --browser=Firefox http://server_domain_nameInstead of AWS, if you wish to use a different cloud computing provider, you can either modify
ec2launchor write your own script to configure the server. Runningec2launchwith the--dry_runoption displays the configuration steps for the Ubuntu Linux instances created using AWS. You may also need to modify the shell script$GTERM_DIR/bin/gterm_user_setup, which currently works with Ubuntu Linux on AWS.Instead of using
rootto run the server, you could also use another account with password-lesssudoprivileges.
Domain name and IP address
A server needs a domain name or IP address to be accessible. When you
start up a new cloud server, it is usually assigned a dynamic IP
address. For temporary use, i.e., during the up-time of the server,
you can simply use this IP address to create an URL for the server
like https://1.2.3.4:8900. AWS also provides a long instance
domain name that can be used to create an URL.
For a prettier and more permanent URL, you need to register a domain
name, say example.com, with a domain registrar like NameCheap.com,
GoDaddy.com, or Gandi.net (for about $10-20 per year). A single domain
registration is sufficient for any number of servers, as you can
always create subdomains. For a single server, you can update the IP
address associated with the domain on the nameservers of the
registrar.
Alternatively, you can enable the Amazon Route 53 service Route 53
service and create a hosted zone for your domain example.com. This
will allow the ec2launch script to automatically handle subdomain
tag names like sub.example.com for your servers. Ensure that the
nameserver records for example.com at your domain registrar
point to the AWS nameservers for the hosted zone.
Network security and port access
The cloud server should be configured to allow access to certain
network ports, particularly ports 22 (ssh), 80 (http), and 443
(https). If you plan to enable running of the “public” IPython
notebook server, you should also allow access to the port range
10000-12000. The ec2launch script automatically sets up an AWS
security group to allow access to these ports.
Note: If you have trouble accessing the instance, check to make sure that the AWS security group associated with the cloud instance allows access to inbound TCP port 22 (for SSH access).
Launching a server instance
To create an AWS instance, you should first run GraphTerm on your
local (single-user) computer as described in the Quick setup
instructions. You will be presented with a web form to enter
configuration details of the instance to be launched. You can specify
a simple tag name to identify each server. If you have set-up the
Route 53 service, you can specify a the tag name is of the form
subdomain.example.com to automatically associate the subdomain
with the server IP address. You can also specify whether to install
additional packages, like pylab for plotting or R for
statistical analysis.
An important configuration choice is the authentication type
(auth_type), which may be one of singleuser, none,
name, multiuser, or login.
singleuser: Authentication type is meant for a single user on a shared computer. You will need to enter the code found in the file
~/.graphterm/_gterm_auth.txtto access the server, or use thegtermcommand to open new GraphTerm windows.none: This requires no authentication, and is meant to be used on a private computer with a single user.
name: This also requires no authentication, but new users choose a unique username. This is meant for demonstration purposes and all users share the same Unix account.
multiuser: For the multiuser case, you typically specify either the
--user_setup=autoor the--user_setup=manualoption. Theautooption allows new users enter enter a group authentication code, along with a unique user name. This creates a new Unix account for the user and generates a unique access code that will be used the next time the user logs in. The super user can view all the access codes using thegauthcommand. (If the users choose to use Google Authentication, they will also be able to login using their GMail account.) The--users_dir=/homeoption can be used to specify the root for all user home directories.login: This uses the standard Unix password authentication, but is permitted only with a localhost server or with HTTPS (for security). Server must be run as
rootand users will not be created automatically. (Not available withec2launch)
Once you fill in the form for ec2launch and submit it, a command
line will be automatically generated, with the specified options, to launch
the instance. You may need to wait several minutes for the instance
setup to complete, depending upon the compute power of the
instance. To launch another instance with slightly different
properties, you can simply recall the command line from history and
edit it. (If you wish to force re-display of the ec2launch form to
edit the command visually, include the --form option in the
recalled command line and execute it.)
Managing instances
The ec2list command can be used to list all running instances, to
connect using SSH, and also to terminate them (using the kill
link).
Starting and stopping GraphTerm server
By default, a publicly accessible graphterm server will be
automatically started on the new instance (and after reboots). Once
the instance is running, you can access the GraphTerm server at
http://domain_name_or_ip_address. You can log in to the instance
using the command ec2ssh ubuntu@domain_name, or copy files to it
using ec2scp file ubuntu@domain_name:
To stop a running server, type:
gtermserver --daemon=stop
To restart it, switch user to root and re-run the startup script
with command options (e.g., /etc/init.d/graphterm).
If you are not using ec2launch, you can start the server explicitly from the command line, e.g.:
gtermserver --daemon=start --auth_type=multiuser --user_setup=auto --logging --nb_server --https --external_port=443 --host=domain_or_ip
The above options configure the server for multiuser authentication,
with https. (ec2launch automatically configures port forwarding
from port 443 to the default graphterm port 8900, enabling even
non-privileged users to run gtermserver.)
An account with password-less sudo privileges is required for new
users to be created automatically (--user_setup=auto option). Running
an Ubuntu linux instance on AWS automatically creates such an account,
named ubuntu, as described here.
By default, GraphTerm server is run from this account. The
--user_setup=auto option creates a file named
~/.graphterm/AUTO_ADD_USERS which can be deleted to suppress
auto-user creation while the server is running.
To automatically start the server when the computer is rebooted, copy
the gtermserver command line to the executable script
/etc/init.d/graphterm on a Ubuntu server followed by
update-rc.d graphterm defaults, or equivalent for other linux flavors
(ec2launch automatically does this for AWS).
Access codes
The master access code is stored in the file
~/.graphterm/@server_gterm_auth.txt in the home directory of the super
user, and can be used to sign in as any user. (To generate new random
access codes, simply delete this file.) To display the access code
for a particular user, use the following command within a GraphTerm on
the remore machine:
gauth -m username
The user-specific access code is also save in the user’s home
directory in ~user/.graphterm/user@server_gterm_auth.txt.
To avoid having to type in the access code every time, you can
download the executable python script $GTERM_DIR/bin/gterm.py
to your desktop/laptop computer. You can then type the following command:
gterm.py -u user http://server_domain
to open a terminal on the remote server. You will be asked for the
access code the first time, and then it can be saved in your
local ~/.graphterm directory for future use.
To display the group access code (needed to generate new accounts), type:
gauth -g -m super_username
on the server.
Using https
You can run the gtermserver with the --https option enabled
for limited security. By default, it will create a self-signed
certificate stored in ~/.graphterm/localhost.pem. Inform users
that self-signed certificates will generate multiple browser warning
messages. (For maximum security, you can purchase a domain
certificate signed by an authority, which is often available through
the domain registrar.)
Running a public IPython Notebook server
Specifying the --nb_server when starting up the GraphTerm server
enables a menu option allowing each user to run the
gnbserver command which starts up a public IPython Notebook server
listening on a unique port number that is tied to the user’s Unix user
ID. (A similar option for ec2launch opens up these ports for
public access.)
If using https, the self-signed certificate created for the
GraphTerm server can be re-used for the IPython public notebook
server, by copying the file ~/.graphterm/localhost.pem to
/var/graphterm/localhost.pem to make it accessible to all users.
Administering the virtual computer lab
The super user can use the shell script gterm_user_setup
in $GTERM_DIR/bin to manually configure new users:
sudo gterm_user_setup username activate server_domain user_email
Note: This script may need to be modified to work on non-AWS servers.
The gadmin command (a work in progress) performs administrative
actions to monitor users:
# Display status for all terminals with path name matching python regexp
gadmin -a sessions [regexp]
Clicking on the displayed terminal list will open up the terminal for viewing (see Dashboard for a “virtual computer lab” - listing user terminal activity).
You can also view multiple user terminals embedded in your own
terminal using the gframe command (see Dashboard for a “virtual computer lab” - viewing user terminals):
gframe --rowheight 300 --border --columns 3 --terminal /bob/quiz1 /jane/quiz1 /jose/quiz1
More information can be found in Embedding and remote terminal commands
Configuring groups
In the multiuser authentication mode, user groups can be configured
the file ~/.graphterm/gterm_groups.json containing a JSON formatted
dictionary, e.g.:
{"group1": ["user1", "user2"],
 "group2": ["user3", "user4", "user5"]}
Users in the same group can see each others’ terminals for collaboration.
Note: At this time, the GraphTerm server needs to be restarted if the group configuration is changed.
Secondary cloud instances
Secondary cloud instances can connect to the GraphTerm server on the primary instance using the command:
gtermhost --daemon=start --server_addr=<server_domain_or_address> <secondary_host_name>
Note: It would be better to use an internal (non-public) network address to connect secondary cloud instances.